It's All About the Eyes - T.A. Nieman
It's All About the Eyes

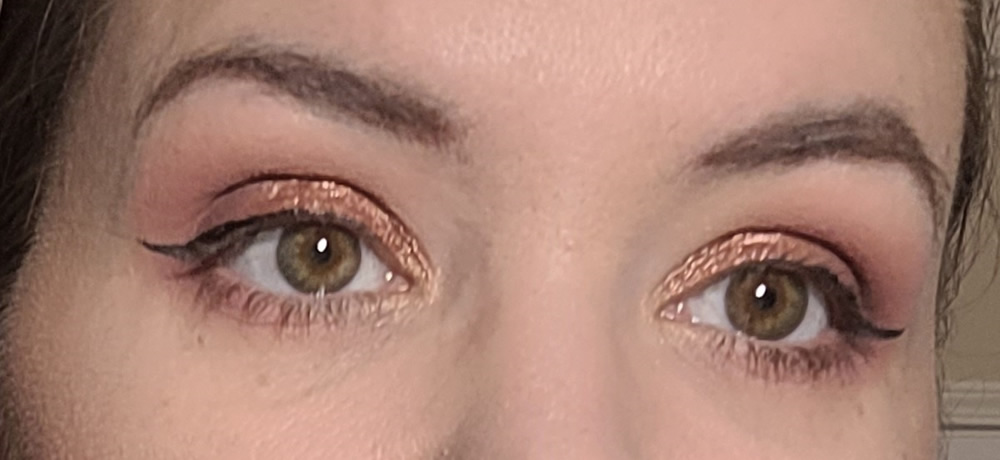
One of the questions that I get asked most often is how do I create my eye looks. It's an interesting topic for me, as I have worked hard to learn pro tips and just generally learn how my own eye shape changes those tips.
In the creation of an eye look, the most important thing is your comfort. Do you want something fancy looking? Do you want the possibility of glitter in your eye? Do you like wings? So many questions to answer, and we haven't even gotten to eye shape yet. Really, the key is to do what you are comfortable with - still keeping yourself open for some splashes of 'danger' in the beauty/color arena.
Let's just start with something basic today. First, make sure your face is properly washed and moisturized. Nothing else is needed yet for the eye, look.
1. Choose your palette: Make it simple at first. Don't go to heavily into something outside your comfort zone until you have more experience. I chose the Twilight Dusk Palette by UCANBE (available on Amazon). This has soft colors and beautiful shimmers which give your eye some extra pizzazz. And life is all about pizzazz!


You can see there are a lot of colors to work with. You can be light/soft with the eye look, or go a little more bold. Today, we are doing an eye look with just three of the colors in this palette. Three you say? That's it? YUP - let's go!
2. Apply base: You don't need to spend lots of money on eye shadow base, or something that advertises as a 'must have' under eye make up. I use my concealer (see my other blogs) as a base:

*Note: I do not have anything on my face yet; we are focusing on eyes first.
2. Powder the base: The brand of powder here isn't as important as the use of it as a whole. You need to dry down your base before you go in with color. Not only does it help the eye makeup stay on longer, but it makes it easier to blend later.

3. Apply base color: Choose a color that is lighter than the rest and sweet it all over your lid, up to just below your eyebrow. This helps create another layer of a base coat and ensure the rest of the color will blend easier. In my palette, I chose to start with Royal:


4. Apply your transition shade: The transition shade is a color darker than your skin tone, but not a bold color. You use this as a blending color between the base color you just put on, and the darker color coming next. In this palette, I chose Amethyst. Take this color and sweet it through and just above your crease.


5. Apply your deep shade: Find a shade that is darker than your transition shade, and focus it on the outter eyelid only. Start with a little and work it up to as dark as you wish - this is where you can decide how you want your eye look to be seen: Bold, or subtle. The deep shade is what gives you this opportunity. For this palette, I chose Cosmo:


*Note: some darker shades can look blotchy at first. My advise is to keep blending. In the picture above, I purposely left it as it looked from one application. Add a little more of the deep shade, and then add in your transition color again and BLEND, BLEND, BLEND, until it looks just the way you want it to.
6. Go with a shimmer shade: This is optional, you don't need to, but I love the way shimmer shades look on my eyes. For this palette, I chose Blood Moon. Take the shimmer (preferably with a wet brush) and apply it to the inner half of your eye, blending it over into the dark shade. This helps create another level of eye look:


7. Clean it all up: Your eye look, on the top lid, is done. Take a makeup wipe and clean up under your eyes. If you used glitter, or any kind of shimmer, chances are you have some fall out. Curl the makeup wipe over your finger and make a clean swipe under your eye all the way to your temple. You can make this line as soft or as strict as you want. My favorite wipes are the Neutrogena ones below: (and this is already well loved)


8. Fill in those brows: Don't forget this step - even if you have lovely brows to begin with, straighten them up by filling them in with a trusty pencil. Look at the difference:

8.1 Sub-step, not always necessary. If you chose to do a wing, my suggestion is to outline what you want the wing to look like, then fill it in. Makes it a lot easier to ensure it's exactly what you want it to be:


Rinse/repeat on the other eye, for a simple look:

9. Put on the rest of your makeup: Primer, foundation, concealer and powder. Stop there, and let's continue with the eye look.
10: Under eye steps: Basically, you repeat the steps above under your eye. Once again, you can choose for this to be as light or as bold as you want. I enjoy some color without being too bold under the eye.
10.1: Base color - over the entire under eye

10.2: Transition color - over three fourths of the under eye

10.3: Deep color - just in the outer corner of the under eye:

11. Mascara: Now, I do mine a little different. I like a lighter under eye mascara than a top layer. My under eye mascara is always a nice deep brown color, where the top is always black. Just the way I like it, and I think it works:
Under eye only:

With top done as well:

Finish your make up and you are all done! The most important tip? ENJOY yourself!

In the creation of an eye look, the most important thing is your comfort. Do you want something fancy looking? Do you want the possibility of glitter in your eye? Do you like wings? So many questions to answer, and we haven't even gotten to eye shape yet. Really, the key is to do what you are comfortable with - still keeping yourself open for some splashes of 'danger' in the beauty/color arena.
Let's just start with something basic today. First, make sure your face is properly washed and moisturized. Nothing else is needed yet for the eye, look.
1. Choose your palette: Make it simple at first. Don't go to heavily into something outside your comfort zone until you have more experience. I chose the Twilight Dusk Palette by UCANBE (available on Amazon). This has soft colors and beautiful shimmers which give your eye some extra pizzazz. And life is all about pizzazz!


You can see there are a lot of colors to work with. You can be light/soft with the eye look, or go a little more bold. Today, we are doing an eye look with just three of the colors in this palette. Three you say? That's it? YUP - let's go!
2. Apply base: You don't need to spend lots of money on eye shadow base, or something that advertises as a 'must have' under eye make up. I use my concealer (see my other blogs) as a base:

*Note: I do not have anything on my face yet; we are focusing on eyes first.
2. Powder the base: The brand of powder here isn't as important as the use of it as a whole. You need to dry down your base before you go in with color. Not only does it help the eye makeup stay on longer, but it makes it easier to blend later.

3. Apply base color: Choose a color that is lighter than the rest and sweet it all over your lid, up to just below your eyebrow. This helps create another layer of a base coat and ensure the rest of the color will blend easier. In my palette, I chose to start with Royal:


4. Apply your transition shade: The transition shade is a color darker than your skin tone, but not a bold color. You use this as a blending color between the base color you just put on, and the darker color coming next. In this palette, I chose Amethyst. Take this color and sweet it through and just above your crease.


5. Apply your deep shade: Find a shade that is darker than your transition shade, and focus it on the outter eyelid only. Start with a little and work it up to as dark as you wish - this is where you can decide how you want your eye look to be seen: Bold, or subtle. The deep shade is what gives you this opportunity. For this palette, I chose Cosmo:


*Note: some darker shades can look blotchy at first. My advise is to keep blending. In the picture above, I purposely left it as it looked from one application. Add a little more of the deep shade, and then add in your transition color again and BLEND, BLEND, BLEND, until it looks just the way you want it to.
6. Go with a shimmer shade: This is optional, you don't need to, but I love the way shimmer shades look on my eyes. For this palette, I chose Blood Moon. Take the shimmer (preferably with a wet brush) and apply it to the inner half of your eye, blending it over into the dark shade. This helps create another level of eye look:


7. Clean it all up: Your eye look, on the top lid, is done. Take a makeup wipe and clean up under your eyes. If you used glitter, or any kind of shimmer, chances are you have some fall out. Curl the makeup wipe over your finger and make a clean swipe under your eye all the way to your temple. You can make this line as soft or as strict as you want. My favorite wipes are the Neutrogena ones below: (and this is already well loved)


8. Fill in those brows: Don't forget this step - even if you have lovely brows to begin with, straighten them up by filling them in with a trusty pencil. Look at the difference:

8.1 Sub-step, not always necessary. If you chose to do a wing, my suggestion is to outline what you want the wing to look like, then fill it in. Makes it a lot easier to ensure it's exactly what you want it to be:


Rinse/repeat on the other eye, for a simple look:

9. Put on the rest of your makeup: Primer, foundation, concealer and powder. Stop there, and let's continue with the eye look.
10: Under eye steps: Basically, you repeat the steps above under your eye. Once again, you can choose for this to be as light or as bold as you want. I enjoy some color without being too bold under the eye.
10.1: Base color - over the entire under eye

10.2: Transition color - over three fourths of the under eye

10.3: Deep color - just in the outer corner of the under eye:

11. Mascara: Now, I do mine a little different. I like a lighter under eye mascara than a top layer. My under eye mascara is always a nice deep brown color, where the top is always black. Just the way I like it, and I think it works:
Under eye only:

With top done as well:

Finish your make up and you are all done! The most important tip? ENJOY yourself!


